


Have you ever accidentally deleted an important file on your Android device, only to realize later that you needed it? It’s a frustrating experience that many of us have encountered at some point.
Fortunately, Android devices offer a safety net in the form of a trash or recycle bin, where deleted files are temporarily stored before being permanently erased. The only challenge lies
how to find trash folder on Android
devices.

In this article, we will guide you through the process of uncovering the trash folder on your Android device, ensuring that you have a chance to recover mistakenly deleted files. Whether you’re using a Samsung, Google Pixel, or any other Android device, we’ll provide you with step-by-step instructions to locate the hidden repository and reclaim your lost data under the use of an
Android data recovery application
. So, let’s dive in and unveil the hidden path to finding the trash folder on your Android device.
Part #1: Is There A Universal Trash Folder for Android?
Part #2: Top Methods on How to Find Trash Folder on Android Devices
Part #3: The Best Method to Recover Deleted Files on Android Devices: FoneDog Android Data Recovery
Part #1: Is There A Universal Trash Folder for Android?
When it comes to the concept of a universal trash folder on Android devices, the answer is both yes and no. Unlike desktop operating systems, Android does not have a system-wide recycle bin or trash folder that captures all deleted files from every app. However, this doesn’t mean that all hope is lost when it comes to recovering accidentally deleted files on your Android device.
While there isn’t a central repository for deleted files, many apps on Android have their own individual trash or recycle bin functionality. This means that certain apps, such as file managers, email clients, gallery apps, and even messaging apps, may have their own designated trash folders where deleted items are temporarily stored before being permanently erased.
For example, if you delete a photo using the default Gallery app on your Android device, it may not be immediately erased from your device. Instead, it might be moved to a specific trash folder within the app, allowing you to recover it within a certain timeframe.
Similarly, email clients like Gmail or Outlook often have a designated trash folder where deleted emails are stored for a specific period before being permanently deleted.
It’s important to note that the presence and functionality of a trash folder vary from app to app. Not all apps offer this feature, and those that do may implement it differently. Some apps might automatically empty the trash folder after a specific time, while others may require manual intervention to permanently delete the items.
In the next part of this article, we will explore how to find trash folder on Android, providing you with the necessary steps to recover deleted files.
Part #2: Top Methods on How to Find Trash Folder on Android Devices
Method #1: Finding the Trash for the Gallery App
The Gallery app is where we often store and manage our precious photos and videos. Accidentally deleting an important image can be distressing, but fear not, as the Gallery app typically offers a trash folder where deleted media can be retrieved. Here’s how to find trash folder on Android using the Gallery app:
- Open the Gallery app: Locate the Gallery app on your Android device and open it. The app icon usually resembles a colorful square or a stylized flower.
-
Access the app’s menu: Look for the
three vertical dots or lines
in the top-right corner of the screen. Tap on it to open the menu. -
Find the Trash or Recycle Bin option: Within the menu, search for an option named
“Trash”, “Recycle Bin”, or “Recently Deleted”
. The specific label may vary depending on your device and Android version. - Tap on the Trash folder: Once you locate the Trash or similar option, tap on it to access the deleted items stored within the Gallery’s trash folder.
-
Recover or permanently delete files: Within the trash folder, you should see a list of deleted photos and videos. Select the items you wish to recover and tap on the appropriate option to restore them to their original location. If you want to permanently delete the files, look for a
“Delete” or “Empty Trash”
option. - Check other apps’ trash folders: Remember that different apps may have their own trash folders. If you delete media from other apps, such as social media platforms or cloud storage services, explore their settings or menus to find the respective trash or recycle bin.
Method #2: Finding the Trash on File Manager App
The File Manager app or Files app on Android devices serves as a hub for managing files, documents, and folders. Some file manager apps offer a built-in trash or recycle bin feature, allowing you to recover accidentally deleted files. Here’s how to locate the trash folder using the File Manager app:
-
Locate and open the File Manager app: Look for the app labeled
“File Manager” or “Files”
on your Android device. It might have an icon resembling a folder or a file cabinet. - Navigate to the app’s menu or settings: Once you have opened the File Manager app, search for a menu or settings icon. It is typically represented by three dots or lines, located in the top-right or top-left corner of the screen.
-
Find the Trash or Recycle Bin option: Within the app’s menu or settings, explore the options and look for a feature called
“Trash”, “Recycle Bin”, or “Deleted Files”
. The specific wording may differ depending on the file manager app you’re using. - Tap on the Trash folder: Once you locate the Trash or similar option, tap on it to access the deleted files stored in the file manager’s trash folder.
-
Restore or permanently delete files: Inside the trash folder, you should see a list of deleted files and folders. Select the items you wish to restore and tap on the appropriate option to recover them to their original location. If you want to permanently delete the files, look for a
“Delete” or “Empty Trash”
option.
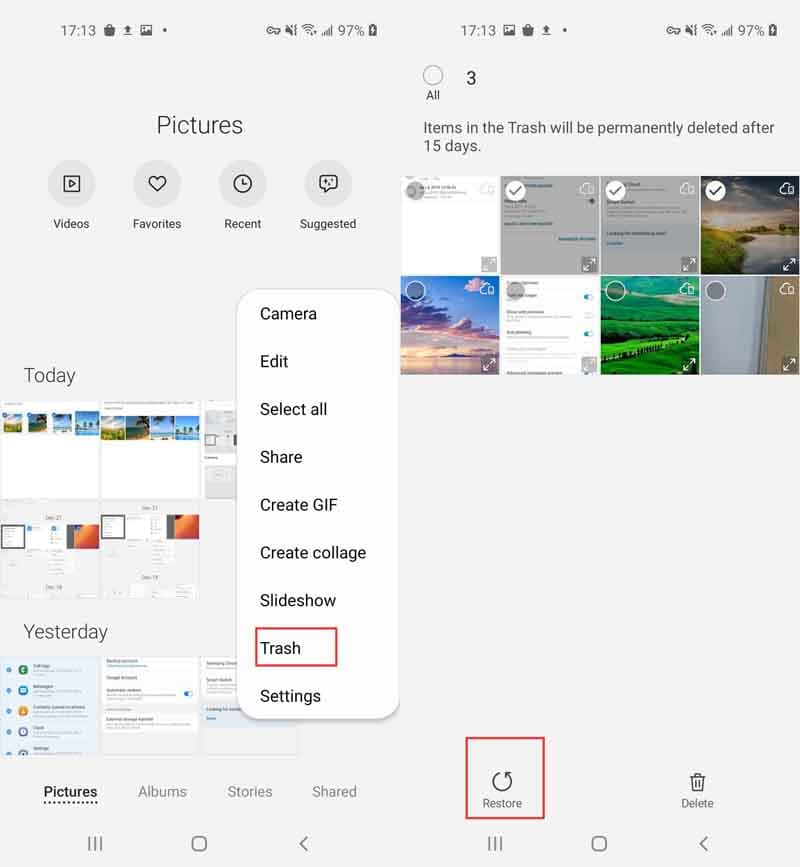
Method #3: Locating the Trash on Samsung Devices
Samsung phones typically come pre-installed with Samsung’s own suite of apps, including a gallery app, email client, and file manager. Each of these apps may have its own trash folder where deleted items are temporarily stored. Here’s how to find trash folder on Android – Samsung phone:
-
Open the Gallery app: Locate the
Gallery app
on your Samsung phone, typically represented by an icon resembling a
colorful square or a stylized flower
. Tap on it to open the app. - Access the app’s menu: Look for the three vertical dots in the top-right corner of the screen or the menu button at the bottom of the screen. Tap on it to open the menu.
-
Find the Trash or Recycle Bin option: Within the menu, search for an option named
“Trash”, “Recycle Bin”, or “Recently Deleted”
. The specific label may vary depending on the version of the Gallery app installed on your Samsung phone. - Tap on the Trash folder: Once you locate the Trash or similar option, tap on it to access the deleted photos and videos stored within the Gallery’s trash folder. From there, you can select and recover the files you want or permanently delete them.
Additionally, Samsung phones typically have a built-in file manager app called
“My Files” or “Samsung Files”
. Here’s how to find the trash folder using the Samsung file manager app:
-
Open the File Manager app: Locate and open the “My Files” or “Samsung Files” app on your Samsung phone. You can typically find it in the
app drawer or on the home screen
. -
Look for the Trash or Recycle Bin: Once you’re inside the file manager app, search for an option labeled
“Trash”, “Recycle Bin”, or “Deleted Files”
. It might be located in the app’s menu or settings. - Tap on the Trash folder: When you find the Trash or similar option, tap on it to access the deleted files and folders stored within the file manager’s trash folder. From there, you can restore or permanently delete the items as needed.
It’s worth noting that the naming and availability of the trash folders may vary slightly depending on the specific Samsung phone model and the version of Samsung’s apps installed on your device. However, these general steps should help you locate the trash folders on your Samsung phone and recover deleted files.
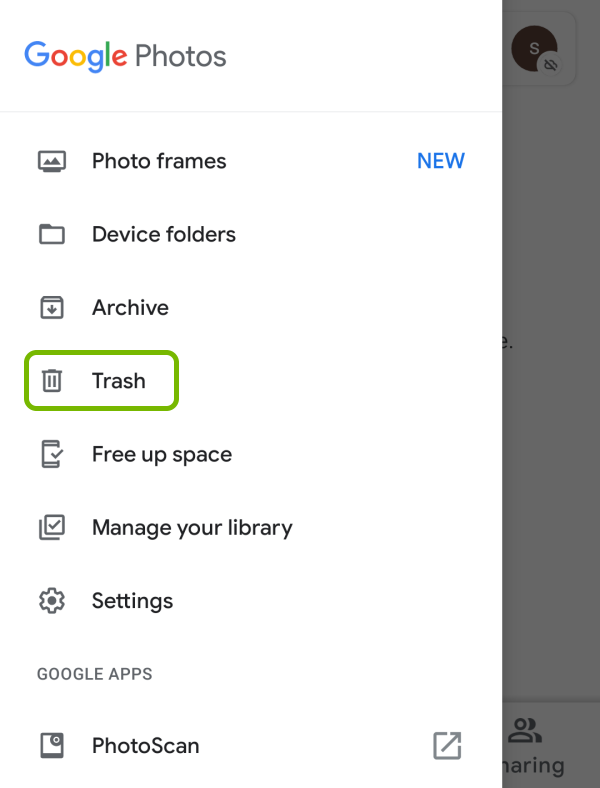
Method #4: Locating the Trash on Google Photos
Google Photos is a popular app for storing and managing photos and videos on Android devices. It offers a trash folder where deleted media is temporarily stored. Here’s how to locate the trash folder in Google Photos:
-
Open the Google Photos app: Locate the Google Photos app on your Android device. It typically has a
multicolored pinwheel icon with a white background
. Tap on it to open the app. - Access the app’s menu: Look for the three horizontal lines, usually located in the top-left or top-right corner of the screen. Tap on it to open the menu.
-
Find the Trash or Bin option: Within the menu, search for an option named
“Trash”, “Bin”, or “Recently Deleted”
. This is where Google Photos stores the deleted photos and videos. The specific label may vary depending on the version of the Google Photos app installed on your device. - Tap on the Trash folder: Once you locate the Trash or similar option, tap on it to access the deleted media stored within the Google Photos trash folder.
-
Restore or permanently delete media: Inside the trash folder, you should see a list of deleted photos and videos. Select the items you wish to restore and tap on the appropriate option to recover them to their original location. If you want to permanently delete the files, look for a
“Delete” or “Empty Trash”
option.
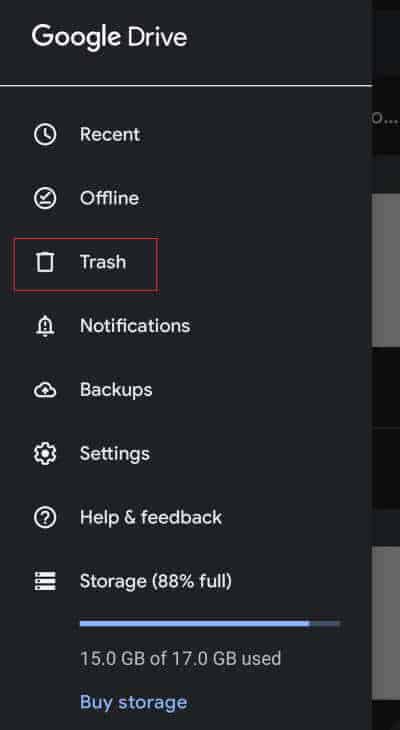
Method #5: How to Find Trash on Android Google Drive App
Google Drive
is a cloud storage and file management app that allows you to store and access your files from anywhere. It also provides a trash folder where deleted files are temporarily stored before being permanently deleted. Here’s how to find trash folder on Android using Google Drive:
-
Open the Google Drive app: Locate the Google Drive app on your Android device. It typically has a
triangular play button icon in green, yellow, and blue
. Tap on it to open the app. - Access the app’s menu: Look for the three horizontal lines or three vertical dots, usually located in the top-left or top-right corner of the screen. Tap on it to open the menu.
-
Find the “Trash” option: Within the menu, search for an option named
“Trash” or “Bin”
. This is where Google Drive stores the deleted files. Tap on it to access the trash folder. -
View and restore files: Inside the trash folder, you will see a list of deleted files and folders. Browse through the items and select the ones you want to restore. Tap on the
restore or recover
option to move them back to their original location in Google Drive. - Permanently delete files: If you want to permanently delete files from the trash folder, select the items and tap on the delete or empty trash option. Keep in mind that once you permanently delete files, they cannot be recovered.
Part #3: The Best Method to Recover Deleted Files on Android Devices: FoneDog Android Data Recovery
This article has talked about
how to find trash folder on Android
devices. We will give a bonus tip about file recovery. Accidentally deleting important files from your Android device can be a distressing experience. Fortunately, there are reliable third-party solutions available, such as
FoneDog Android Data Recovery
, that can help you recover deleted files with ease. FoneDog Android Data Recovery is a powerful tool designed specifically for Android devices to retrieve lost or deleted data.
Here’s how to use the tool:
- Download and install FoneDog Android Data Recovery on your computer.
- Launch the program and connect your Android device to the computer using a USB cable.
-
Follow the on-screen instructions to enable USB
debugging
on your Android device. This allows the software to establish a connection with your device. - Once the connection is established, select the file types you want to recover.
-
Click on the
“Scan”
button to initiate the scanning process. The software will thoroughly scan your device for deleted files. - After the scan is complete, preview the recoverable files and select the ones you want to restore.
-
Click on the
“Recover”
button and choose a location on your computer to save the recovered files.

It’s important to note that the success of data recovery depends on various factors, such as the length of time since the files were deleted and the extent of data overwritten on the device. Therefore, it’s recommended to perform the recovery process as soon as possible.
In conclusion, FoneDog Android Data Recovery is an effective and user-friendly solution for
recovering deleted files in Android devices’ inner storage
. With its powerful features and intuitive interface, it can help you retrieve your valuable data and alleviate the stress of accidental deletions.
People Also Read
BEST GUIDE: How to Access Google Cloud on Android Devices
How to Export Text Messages From Android To PDF


